Debian 9/10 编译安装nginx

Debian 9, Debian 10 都适用于此教程.

实际上,Nginx 的官方repo编译的nginx,已经把能加上的module全部都加上了,因此在一般情况下,建议使用nginx的官方repo来安装nginx. 但是如果说你想添加第三方的module,或者使用最新的openssl 的话,在或者更改一下nginx 的安装路径的话,就需要自己编译了. 此篇教程尽量按照nginx官方repo的configure来编译安装openssl.

在一台全新安装的Debian 9或者Debian 10上:

更多

Debian 9 通过nginx repo 安装的nginx的配置解析

鉴于目前很多cloud 和 vps 的服务商还不提供debian 10 的模板,因此这里就先研究debian 9 的

root@vultr:~# nginx -V
nginx version: nginx/1.17.6
built by gcc 6.3.0 20170516 (Debian 6.3.0-18+deb9u1)
built with OpenSSL 1.1.0k 28 May 2019 (running with OpenSSL 1.1.0l 10 Sep 2019)
TLS SNI support enabled
configure arguments: --prefix=/etc/nginx --sbin-path=/usr/sbin/nginx --modules-path=/usr/lib/nginx/modules --conf-path=/etc/nginx/nginx.conf --error-log-path=/var/log/nginx/error.log --http-log-path=/var/log/nginx/access.log --pid-path=/var/run/nginx.pid --lock-path=/var/run/nginx.lock --http-client-body-temp-path=/var/cache/nginx/client_temp --http-proxy-temp-path=/var/cache/nginx/proxy_temp --http-fastcgi-temp-path=/var/cache/nginx/fastcgi_temp --http-uwsgi-temp-path=/var/cache/nginx/uwsgi_temp --http-scgi-temp-path=/var/cache/nginx/scgi_temp --user=nginx --group=nginx --with-compat --with-file-aio --with-threads --with-http_addition_module --with-http_auth_request_module --with-http_dav_module --with-http_flv_module --with-http_gunzip_module --with-http_gzip_static_module --with-http_mp4_module --with-http_random_index_module --with-http_realip_module --with-http_secure_link_module --with-http_slice_module --with-http_ssl_module --with-http_stub_status_module --with-http_sub_module --with-http_v2_module --with-mail --with-mail_ssl_module --with-stream --with-stream_realip_module --with-stream_ssl_module --with-stream_ssl_preread_module --with-cc-opt='-g -O2 -fdebug-prefix-map=/data/builder/debuild/nginx-1.17.6/debian/debuild-base/nginx-1.17.6=. -fstack-protector-strong -Wformat -Werror=format-security -Wp,-D_FORTIFY_SOURCE=2 -fPIC' --with-ld-opt='-Wl,-z,relro -Wl,-z,now -Wl,--as-needed -pie'

debian 9 自带openssl

root@vultr:~# openssl version
OpenSSL 1.1.0l 10 Sep 2019

debian 9 自带openssl的版本正是1.1.0l, 但是编译的是用1.1.0k

debian 9 用apt install gcc 以后,得到的版本是:

root@vultr:~# gcc -v
Using built-in specs.
COLLECT_GCC=gcc
COLLECT_LTO_WRAPPER=/usr/lib/gcc/x86_64-linux-gnu/6/lto-wrapper
Target: x86_64-linux-gnu
Configured with: ../src/configure -v --with-pkgversion='Debian 6.3.0-18+deb9u1' --with-bugurl=file:///usr/share/doc/gcc-6/README.Bugs --enable-languages=c,ada,c++,java,go,d,fortran,objc,obj-c++ --prefix=/usr --program-suffix=-6 --program-prefix=x86_64-linux-gnu- --enable-shared --enable-linker-build-id --libexecdir=/usr/lib --without-included-gettext --enable-threads=posix --libdir=/usr/lib --enable-nls --with-sysroot=/ --enable-clocale=gnu --enable-libstdcxx-debug --enable-libstdcxx-time=yes --with-default-libstdcxx-abi=new --enable-gnu-unique-object --disable-vtable-verify --enable-libmpx --enable-plugin --enable-default-pie --with-system-zlib --disable-browser-plugin --enable-java-awt=gtk --enable-gtk-cairo --with-java-home=/usr/lib/jvm/java-1.5.0-gcj-6-amd64/jre --enable-java-home --with-jvm-root-dir=/usr/lib/jvm/java-1.5.0-gcj-6-amd64 --with-jvm-jar-dir=/usr/lib/jvm-exports/java-1.5.0-gcj-6-amd64 --with-arch-directory=amd64 --with-ecj-jar=/usr/share/java/eclipse-ecj.jar --with-target-system-zlib --enable-objc-gc=auto --enable-multiarch --with-arch-32=i686 --with-abi=m64 --with-multilib-list=m32,m64,mx32 --enable-multilib --with-tune=generic --enable-checking=release --build=x86_64-linux-gnu --host=x86_64-linux-gnu --target=x86_64-linux-gnu
Thread model: posix
gcc version 6.3.0 20170516 (Debian 6.3.0-18+deb9u1)

正是我们用来编译nginx的版本,看来nginx 在debian 9下的编译,都是使用repo 自带的版本,没有使用任何特殊的版本

下面看下user group:

nginx:x:110:113:nginx user,,,:/nonexistent:/bin/false

看看user group history:

root@vultr:/var/log# grep nginx auth.log
Dec 11 09:08:55 vultr groupadd[1614]: group added to /etc/group: name=nginx, GID=113
Dec 11 09:08:55 vultr groupadd[1614]: group added to /etc/gshadow: name=nginx
Dec 11 09:08:55 vultr groupadd[1614]: new group: name=nginx, GID=113
Dec 11 09:08:55 vultr useradd[1620]: new user: name=nginx, UID=110, GID=113, home=/nonexistent, shell=/bin/false
Dec 11 09:08:55 vultr chage[1625]: changed password expiry for nginx
Dec 11 09:08:55 vultr chfn[1628]: changed user 'nginx' information

可以看到nginx user 和 group 被加入了system user 和group,因为从/etc/login.defs 我们可以看到:

# Min/max values for automatic uid selection in useradd
#
UID_MIN 1000
UID_MAX 60000
# System accounts
#SYS_UID_MIN 100
#SYS_UID_MAX 999

#
# Min/max values for automatic gid selection in groupadd
#
GID_MIN 1000
GID_MAX 60000
# System accounts
#SYS_GID_MIN 100
#SYS_GID_MAX 999

看看nginx service 的配置:

root@vultr:~# nano /lib/systemd/system/nginx.service

[Unit]
Description=nginx - high performance web server
Documentation=http://nginx.org/en/docs/
After=network-online.target remote-fs.target nss-lookup.target
Wants=network-online.target

[Service]
Type=forking
PIDFile=/var/run/nginx.pid
ExecStart=/usr/sbin/nginx -c /etc/nginx/nginx.conf
ExecReload=/bin/kill -s HUP $MAINPID
ExecStop=/bin/kill -s TERM $MAINPID

[Install]
WantedBy=multi-user.target

这个systemd 的配置和centos 的一模一样

Nginx 前挂Cloudflare 后的日志分析

将nginx服务器隐藏在cloudflare 服务后端,在nginx 的默认access log里面显示的IP 都是cloudflare,因此我们需要把日志中的访问IP改成真正的用户IP. 有很多种办法可以实现,但是下面的这种办法应该是最简单的.

Cloudflare 用X-Forwarded-For这个header 来传递用户的真实IP,因此我们只需要在nginx 的conf中,设置一个新的nginx log format就可以.

默认的nginx access log format 是:

log_format combined '$remote_addr - $remote_user [$time_local] '
                    '"$request" $status $body_bytes_sent '
                    '"$http_referer" "$http_user_agent"'; 

我们可以添加一个新的log format:

log_format csf '$http_x_forwarded_for - $remote_user [$time_local] '
                    '"$request" $status $body_bytes_sent '
                    '"$http_referer" "$http_user_agent"';

access log 可以设置成类似于这样的:

access_log /your/access/log/path csf;

这样,用户的真实IP就会展现在access log里面了

nginx 和 cgi, fcgi 以及php-cgi, php-fpm

在apache 称雄的时代,经常会看到cgi,但是随着nginx 的出现以及时代的进步, cgi 的程序越来越少了.

最近有需求安装smokeping,因此cgi 又被拿了出来

CGI是common gateway interface的缩写,大家都译作通用网关接口,但很不幸,我们无法见名知意。

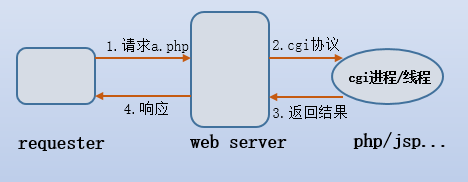
我们知道,web服务器所处理的内容都是静态的,要想处理动态内容,需要依赖于web应用程序,如php、jsp、python、perl等。但是web server如何将动态的请求传递给这些应用程序?它所依赖的就是cgi协议。没错,是协议,也就是web server和web应用程序交流时的规范。换句话说,通过cgi协议,再结合已搭建好的web应用程序,就可以让web server也能”处理”动态请求(或者说,当用户访问某个特定资源时,可以触发执行某个web应用程序来实现特定功能),你肯定知道处理两字为什么要加上双引号。CGI可以是任何的可执行程序,可以是Shell脚本,二进制应用,或者其他的脚本(Python脚本,Ruby脚本等)

简单的cgi工作方式如下:

有多种方式可以执行cgi程序,但对http的请求方法来说,只有get和post两种方法允许执行cgi脚本。实际上post方法的内部本质还是get方法,只不过在发送http请求时,get和post方法对url中的参数处理方式不一样而已。

任何一种语言都能编写CGI,只不过有些语言比较擅长,有些语言则非常繁琐,例如用bash shell开发,那么需要用echo等打印语句将执行结果放在巨多无比的html的标签中输出给客户端。常用于编写CGI的语言有perl、php、python等,java也一样能写,但java的servlet完全能实现CGI的功能,且更优化、更利于开发

总体上来说,CGI(common gateway interface) 就是所谓的短生存应用程序,Fast CGI 就是所谓的长生存应用程序. FastCGI 像是一个常驻 long-live 型的CGI, 它可以一直执行者,不会每次都要话费时间去fork一次

CGI 和 fastcgi 有自己输入和输出标准,比如HTTP头部, CGI环境变量,get和post等等

CGI, Fast-CGI 是protocols, CGI 慢点, Fast-CGI 要快很多

CGI程序能够用 Python, PERL, Shell, C or C++等语言来实现,尽管没有明确的规定,但是一般用C写的cgi,我们会用.cgi作为后缀,用perl 的用.pl作为后缀,其实我们都可以用.cgi作为后缀. Perl由于其跨操作系统、易于修改的特性成为了CGI的主流编写语言,以至于一般的“cgi程序”就是Perl程序

nginx + fastcgi: nginx只能处理静态文件,对于动态文件,一般用fastcgi 来作为“沟通”的协议. fastcgi 进程由fastcgi 进程管理器管理,而不是nginx,这样就需要一个fastcgi 管理器,这里可以使用spawn-fcgi 作为fastcgi 的进程管理器

nginx + cgi: nginx 不能直接执行外部可执行程序,因此nginx天生不支持cgi的, nginx 虽然不支持cgi,但是他“支持”fastCGI, 这样我们可以fastcgi 来wrap 一下cgi,这样变相的支持cgi,常见的fastcgi wrapper 有fcgiwrap

另外其实cgi 程序也可以被当成fastCGI,因此也可以用nginx + spawn-fcgi 来执行cgi

Spawn-FCGI是一个通用的FastCGI管理服务器,它是lighttpd中的一部份,很多人都用Lighttpd的Spawn-FCGI进行FastCGI模式下的管理工作,不过有不少缺点。而PHP-FPM的出现多少缓解了一些问题

fastcgi 是一个协议, php-fpm 实现了这个协议

通过webserver 来运行php, 一般有两种方式,一个是php-cgi, 另外一个php-fpm (php FastCGI Process Manager) (apache 的mod_php, 把php当作一个模块来执行,以及cli 和 isapi 不在考虑范围之内, php总共来说有5种执行模式)

php-fpm 比传统的CGI方式 (suPHP) 要快,

php-cgi是php自带的fastcgi进程管理器,php-cgi变更php.ini配置后需重启php-cgi才能让新的php-ini生效,不可以平滑重启。另外直接杀死php-cgi进程,php就不能运行了,但是php-fpm和 spawn-fcgi就没有此类问题

php-fpm 就是一个支持php 解析的 fastcgi进程管理器,只能适用于php,其余语言写的cgi,例如perl,python,C,都不能使用

mod_php 和 php-fpm 是运行php 的两种方式,mod_php 是running php as apache module

在segmentfault上看到了一个文章,写的很不错https://segmentfault.com/q/1010000000256516

你(PHP)去和爱斯基摩人(web服务器,如 Apache、Nginx)谈生意

你说中文(PHP代码),他说爱斯基摩语(C代码),互相听不懂,怎么办?那就都把各自说的话转换成英语(FastCGI 协议)吧。

怎么转换呢?你就要使用一个翻译机(PHP-FPM)
(当然对方也有一个翻译机,那个是他自带的)

我们这个翻译机是最新型的,老式的那个(PHP-CGI)被淘汰了。不过它(PHP-FPM)只有年轻人(Linux系统)会用,老头子们(Windows系统)不会摆弄它,只好继续用老式的那个。

CentOS 7 Nginx 默认配置

在centos 7 下,用nginx official repo安装的nginx stable版本的config 默认配置如下:

user nginx;
worker_processes 1;

error_log /var/log/nginx/error.log warn;
pid /var/run/nginx.pid;


events {
worker_connections 1024;
}


http {
include /etc/nginx/mime.types;
default_type application/octet-stream;

log_format main '$remote_addr - $remote_user [$time_local] "$request" '
'$status $body_bytes_sent "$http_referer" '
'"$http_user_agent" "$http_x_forwarded_for"';

access_log /var/log/nginx/access.log main;

sendfile on;
#tcp_nopush on;

keepalive_timeout 65;

#gzip on;

include /etc/nginx/conf.d/*.conf;
}

但是很明显, 这个配置过于简单了,结合军哥的LNMP,我们可以稍微改动一下config:

user nginx;

worker_processes auto;
worker_cpu_affinity auto;

error_log /var/log/nginx/error.log warn;
pid /var/run/nginx.pid;

#Specifies the value for maximum file descriptors that can be opened by this process.
worker_rlimit_nofile 51200;

events {
use epoll;
worker_connections 51200;
multi_accept off;
accept_mutex off;
}


http {
include /etc/nginx/mime.types;
default_type application/octet-stream;

server_names_hash_bucket_size 128;
client_header_buffer_size 32k;
large_client_header_buffers 4 32k;
client_max_body_size 50m;

sendfile on;
sendfile_max_chunk 512k;
tcp_nopush on;

keepalive_timeout 60;

tcp_nodelay on;


gzip on;
gzip_min_length 1k;
gzip_buffers 4 16k;
gzip_http_version 1.1;
gzip_comp_level 2;
gzip_types text/plain application/javascript application/x-javascript text/javascript text/css application/xml application/xml+rss;
gzip_vary on;
gzip_proxied expired no-cache no-store private auth;
gzip_disable "MSIE [1-6]\.";

#limit_conn_zone $binary_remote_addr zone=perip:10m;
##If enable limit_conn_zone,add "limit_conn perip 10;" to server section.


server_tokens off;
access_log off;

server {

listen 80 default_server;
server_name _;
index index.html index.htm index.php;
root /usr/share/nginx/html;


}


include /etc/nginx/conf.d/*.conf;
}

在CentOS7上,nginx的启动是有systemd 来管理的,位置在/usr/lib/systemd/system/nginx.service

配置文件为:

[Unit]
Description=nginx - high performance web server
Documentation=http://nginx.org/en/docs/
After=network-online.target remote-fs.target nss-lookup.target
Wants=network-online.target

[Service]
Type=forking
PIDFile=/var/run/nginx.pid
ExecStart=/usr/sbin/nginx -c /etc/nginx/nginx.conf
ExecReload=/bin/kill -s HUP $MAINPID
ExecStop=/bin/kill -s TERM $MAINPID

[Install]
WantedBy=multi-user.target

Nginx安装Sectigo 的essential SSL

以前一直使用的是rapid SSL,但是rapid SSL 最近爆出了一些问题,因此开始转向我以前不是很喜欢的comodo,也就是现在的sectigo.

安装过程和rapid ssl 大同小异,有些不同的地方在rapid ssl 的intermediate certificate 只有一个文件,而comodo sectigo essential 的 chain files 确有三个, 需要注意的是chain files 根据时间的流逝,可能会有新的chain files产生, 而sectigo 的官方support 更新比较慢,建议自己从email 中合成chain file

chain file 从上到下,应该是SectigoRSADomainValidationSecureServerCA,USERTrustRSAAddTrustCA,AddTrustExternalCARoot

在nginx下,crt 是需要和chain file 合在一起的,因此在最后的crt中,应包含的证书,从上到下是 CRT, SectigoRSADomainValidationSecureServerCA,USERTrustRSAAddTrustCA,AddTrustExternalCARoot


nginx 带query string argument 的URL 跳转

nginx 自带的三个命令,  return, rewrite, try-files功能非常强大,基本可以完成各式各样的跳转, 比如下面的:

server {

    listen 80;

   server_name example.com;

   return 301 https://www.example.com$uri;

}

这样就完成了一个不带www的domain转向带SSL以及www前缀的domain的跳转

$uri: 按照nginx官方文档的话来说,就是current normalized URI in REQUEST

$request_uri: full original request URI (with arguments)

这里很明显就看到了$uri和$request_uri的区别,$uri 是 normalized的,换句话说,就是

  1. 去除了?以及后面的query参数
  2. encoded URL被 decoded

因此这里就出现了一个问题: exapmle.com/test.php?a=b 会跳转到https://www.example.com/test.php, query string丢失了,解决的办法很简单

return 301 https://www.example.com$uri$is_args$args
或者
return 301 https://www.example.com$request_uri

$is_args is an emprt string if there are no arguments, or a ? to signify the start of the query string.

$args then adds the arguments,

CentOS7安装Smokeping2.7.3

准备把国内的一些服务外迁,这里正好做个网络监控来监控以下,smokeping部署在aliyun Hong Kong B区

首先需要删除ECS Centos7中自带的一些阿里云监控

卸载安骑士以及监控:

wget http://update.aegis.aliyun.com/download/uninstall.sh
chmod +x uninstall.sh
./uninstall.sh


wget http://update.aegis.aliyun.com/download/quartz_uninstall.sh
chmod +x quartz_uninstall.sh
./quartz_uninstall.sh

可以使用

ps -aux |grep aliyun

来查看是否还有活动的aliyun 服务进程

删除残留服务:

pkill aliyun-service
rm -rf /etc/init.d/agentwatch
rm -rf /usr/sbin/aliyun*
rm -rf /usr/local/aegis*
rm -rf /etc/systemd/system/aliyun*

检查是否有cloudmonitor

cd /usr/local/cloudmonitor/
ls
/usr/local/cloudmonitor/wrapper/bin/cloudmonitor.sh stop
/usr/local/cloudmonitor/wrapper/bin/cloudmonitor.sh remove
rm -rf /usr/local/cloudmonitor

这样才算基本完成删除的aliyun的残留服务

某些文章上还会写有屏蔽云盾的IP,有时间还是得看看log来查看是不是有必要屏蔽云盾的IP

iptables -I INPUT -s 140.205.201.0/28 -j DROP
iptables -I INPUT -s 140.205.201.16/29 -j DROP
iptables -I INPUT -s 140.205.201.32/28 -j DROP
iptables -I INPUT -s 140.205.225.192/29 -j DROP
iptables -I INPUT -s 140.205.225.200/30 -j DROP
iptables -I INPUT -s 140.205.225.184/29 -j DROP
iptables -I INPUT -s 140.205.225.183/32 -j DROP
iptables -I INPUT -s 140.205.225.206/32 -j DROP
iptables -I INPUT -s 140.205.225.205/32 -j DROP
iptables -I INPUT -s 140.205.225.195/32 -j DROP
iptables -I INPUT -s 140.205.225.204/32 -j DROP

这篇文章到了这里才算是完成了服务器的初始清理工作

在安装之前我们需要关闭selinux, firewall, 同步一下时间

yum -y install ntpdate
ntpdate 0.pool.ntp.org
sestatus

或者从www.ntppool.org中选择一个

下面开始进入安装工作 ,其实在作者的官方网站把过程写的清清楚楚:

https://oss.oetiker.ch/smokeping/doc/smokeping_install.en.html
  1. 安装epel package
yum install epel-release -y

    2. 安装development tools

yum groupinstall "Development tools" -y

     3. 安装fping (smokeping 2.7.2以上需要fping4.0以上,因此需要手动编译)

cd ~
wget https://fping.org/dist/fping-4.2.tar.gz
tar -zxvf fping-4.2.tar.gz
cd fping-4.2
./configure
make
make install

安装好的fping位于/usr/local/sbin/fping

      4. 安装echoping (预防以后需要做tcp ping)

cd ~
wget https://fossies.org/linux/misc/old/echoping-6.0.2.tar.gz
tar -zxvf echoping-6.0.2.tar.gz
cd echoping-6.0.2
yum install -y popt-devel openssl openssl-devel
./configure --with-ssl --without-libidn
make
make install

安装好的echoping位于/usr/local/bin/echoping

        5 安装需要的package

cd ~
yum install rrdtool rrdtool-perl curl bind-utils gcc make vim gcc-c++ -y
yum install perl-core -y

5.5 开启SSL支持

yum install perl-LWP-Protocol-https

6. 安装apache, 注意smokeping是fcgi程序,因此apache 需要安装mod_fcgid, http的版本是2.4.6,

yum install httpd httpd-devel
yum install mod_fcgid
systemctl enable httpd

        7. 安装nginx, nginx的版本是1.16

//or reference http://nginx.org/en/linux_packages.html#RHEL-CentOS
yum install nginx -y

systemctl enable nginx

service nginx start

    8 安装smokeping

cd ~

wget https://oss.oetiker.ch/smokeping/pub/smokeping-2.7.3.tar.gz

tar -zxvf smokeping-2.7.3.tar.gz

cd smokeping-2.7.3

./configure --prefix=/opt/smokeping PERL5LIB=/usr/lib64/perl5/

/usr/bin/gmake install


注意,如果我们不加上 ./configure –prefix=/opt/smokeping PERL5LIB=/usr/lib64/perl5/,会提示下面的:


** Ready to install Smokeping ******************************

Settings:

PERL5LIB = not set
PERL = /usr/bin/perl

The Smokeping Makefiles use GNU make functionality.
Continue installation with

/usr/bin/gmake install


如果我们加上PERL5LIB=/usr/lib64/perl5的话,会显示如下:

** Ready to install Smokeping ******************************

Settings:

PERL5LIB = /usr/lib64/perl5/
PERL = /usr/bin/perl

The Smokeping Makefiles use GNU make functionality.
Continue installation with

/usr/bin/gmake install

9 初始化smokeping, 我们需要建立三个文件夹,data用来存放rrd文件,var用来存放smokeping的pid, log用来存放smokeping.log

cd /opt/smokeping

mkdir data var log

chmod 777 data var log

touch log/smokeping.log

rename config file and set permission

cd /opt/smokeping/etc/

for foo in *.dist; do cp $foo `basename $foo .dist`; done

chmod 600 /opt/smokeping/etc/smokeping_secrets.dist

配置config文件

编辑/opt/smokeping/etc/config, 配置从github上download

重启smokeping或者重载配置:

/opt/smokeping/bin/smokeping --reload
/opt/smokeping/bin/smokeping --restart

10 设置apache

把/opt/smokeping/htdoc下面的文件copy到/var/www/html去

同时在/var/www/html目录下

mkdir cache

chmod 777 cache

把smokeping.fcgi.dist改名为smokeping.fcgi放到cgi-bin下面

11 编辑apache 配置文件

设置Listen 80 为

Listen 8080

设置 /var/www/html

AllowOverride All

设置/var/www/cgi-bin

AllowOverride All

同时配置一下mod_fcgid的参数,否则可能会因为需要监测的hosts的数量太多,引起fcgid错误,比如说如下的错误:

[Mon jan 30 15:31:44.937317 2019] [fcgid:warn] [pid 17946] [client 127.0.0.1:53506] mod_fcgid: HTTP request length 135754 (so far) exceeds MaxRequestLen (131072)

编辑

vi /etc/httpd/conf.d/fcgid.conf

再最下面添加:

FcgidMaxRequestLen 4000000

12 配置nginx

配置文件:

server{
listen 80;
server_name www.xxxxxx.com;
index index.html index.htm index.php default.html default.htm default.php;
access_log off;
error_log /var/log/nginx/www.xxxxxx.com.error.log;
location / {
proxy_pass http://127.0.0.1:8080;
#Proxy Settings
proxy_redirect off;
proxy_set_header Host $host;
proxy_set_header X-Real-IP $remote_addr;
proxy_set_header X-Forwarded-For $proxy_add_x_forwarded_for;
proxy_next_upstream error timeout invalid_header http_500 http_502 http_503 http_504;
proxy_max_temp_file_size 0;
proxy_connect_timeout 90;
proxy_send_timeout 90;
proxy_read_timeout 90;
proxy_buffer_size 128k;
proxy_buffers 6 32k;
proxy_busy_buffers_size 128k;
proxy_temp_file_write_size 128k;
client_max_body_size 50m;
}
}

13 进入/var/www/html, 设置.htaccess

RewriteEngine On
RewriteRule ^$ /cgi-bin/smokeping.fcgi [NC,L]

14. 写入smokeping自启动文件

编辑/etc/systemd/system/smokeping.service

[Unit]
Description=Latency Logging and Graphing System
After=syslog.target network.target

[Service]
ExecStart=/opt/smokeping/bin/smokeping
ExecReload=/bin/kill -HUP $MAINPID
StandardError=syslog
Type=forking
PIDFile=/opt/smokeping/var/smokeping.pid


[Install]
WantedBy=multi-user.target


设置完整个以后

别忘了重启daemon

systemctl daemon-reload

下面主要是slave的安装设置:

15) 对于slave来说, 基本过程和上面一样,但是apache 和nginx 是不需要安装的, 也就是跳过步骤6和7

然后如下:

cd ~

wget https://oss.oetiker.ch/smokeping/pub/smokeping-2.7.3.tar.gz

tar -zxvf smokeping-2.7.3.tar.gz

cd smokeping-2.7.3

./configure --prefix=/opt/smokeping PERL5LIB=/usr/lib64/perl5/

/usr/bin/gmake install

cd /opt/smokeping

mkdir data var cache

chmod 777 data var cache

设置slave的密码文件,路径为/opt/smokeping/etc/secret.txt

vi /opt/smokeping/etc/secret.txt

为了方便后面的教程,假设slave的密码是gcphongkong,我们这里在secret.txt里面只需要写入gcphongkong,其他的都不需要

chmod 600 /opt/smokeping/etc/secret.txt

这里如果不设置600,会被报错

slave 需要提供一个hostname,为了方便,这个name可以不是这个服务器的真实的hostname,可以在启动文件中添加slave name,这里我们设置为gcphk

16) 启动文件也因此需要做一些修改, 编辑/etc/systemd/system/smokeping.service, 重点关注 –slave-name 这个配置

[Unit]
Description=Latency Logging and Graphing System
After=syslog.target network.target

[Service]
ExecStart=/opt/smokeping/bin/smokeping --master-url=http://xxx.xxx.xxx/cgi-bin/smokeping.fcgi --cache-dir=/opt/smokeping/cache/ --slave-name=gcphk --shared-secret=/opt/smokeping/etc/secret.txt --pid-dir=/opt/smokeping/var --logfile=/opt/smokeping/smokeping.log
ExecReload=/bin/kill -HUP $MAINPID
StandardError=syslog
Type=forking
PIDFile=/opt/smokeping/var/smokeping.pid


[Install]
WantedBy=multi-user.target

设置完systemd以后,我们需要重启daemon

systemctl daemon-reload

这样我们就配置完成了slave,配置了slave 先不要启动,必须得先在master上配置完以后再启动slave,这样才能读取配置

17) slave的hostname的解释

slave 的hostname 需要和master 的secret.txt相对应

这里的hostname 可以不是服务器真正的hostname,只要master认为是就可以了,具体设置可以看16,如果不在启动配置上添加”–slave-name”参数,那么就需要服务器真正的hostname与master上的文件相对应

18)

在Master上的设置:

在/opt/smokeping/etc/config 中添加slave 部分:

*** Slaves ***
secrets=/opt/smokeping/etc/smokeping_secrets

+gcphk
display_name = GCP_HK
location = HK
color = ff0000

在底部target这里,加上

*** Targets ***

slaves = gcphk

这个配置简单易懂,然后 smokeping_secrets里面配置secrets,格式是host:secrets

如果按照图上的slave来说,就应该是

gcphk:gcphongkong

同时smokeping_secrets的权限应该设置为600,否则会被slave 报错, 同时apache也要有权限read smokeping_secrets, 因此可以这样

chown apache:apache smokeping_secrets
chown apache:apache config

chmod 600 smokeping_secrets

然后reload smokeping和httpd

systemctl reload smokeping

systemctl reload httpd

然后再slave 启动smokeping

systemctl start smokeping

systemctl enable smokeping


FAQ:

  1. Q: Slave端正常,但是不显示slave的数据;新增监控点不显示数据;

这是因为slave 是通过apache或者nginx写入数据到/opt/smokeping/data 的,如果slave的数据不显示,则是apache或者nginx对data 文件夹以及里面的文件没有写入权限,因此可以这样:

chown apache:apche /opt/smokeping/data -R

chown nginx:nginx /opt/smokeping/data -R

在centos下通过编译安装的smokeping,都是以root运行的,因此修改data 下面的文件夹以及文件权限,是没有任何问题的
 

apache2.4 运行cgi的几种方式

我这边的服务器的web server基本上都是nginx的,但是今天在配置smokeping的时候,发现还得是使用apache做为后端来跑cgi,nginx对于cgi以及fastcgi的支持不是太好,google了一整天才发现原来apache的官方文档才是最好的资料. 本文以下内容均以apache2.4 为标准

如果我们想让apache来运行cgi程序,我们首先需要配置apache来允许cgi 程序. 主要有以下几种方式:

首先我们需要注意的是,无论是以哪种方式运行,我们都需要保证在http.conf中,LoadModule命令中要有cgi或者fcgi的模块:

LoadModule cgid_module modules/mod_cgid.so

or

LoadModule fcgid_module modules/mod_fcgid.so

因为fastcgi要比cgi要快很多,因此建议这里都使用fastcgi的module

在通过yum安装完apache 以后,我们可以直接用

yum install mod_fcgid

来安装apache fastcgi module

方式一: ScriptAlias

ScriptAlias 告诉apache有一个目录被专门设定来跑cgi程序, apache也会因此默认这个目录里面都是cgi程序,进而用cgi的handler来执行

ScriptAlias 命令:

ScriptAlias "/cgi-bin/" "/usr/local/apache2/cgi-bin/"

这里需要注意的是, ScriptAlias和Alias不同, ScriptAlias被专门用cgi程序的alias, Alias则是普通意义上的一个目录的map命令

方式二: CGI outside of ScriptAlias directories

我们经常会遇到把cgi程序放在/cgi-bin/外面的情况,我们只需要两步就可以完成这个任务: 1)  用AddHandler或者SetHandler 来设置cgi-script的handler 2) 在Options命令中,必须指定ExecCGI

以下是用options的方式来设定CGI运行:

<Directory "/usr/local/apache2/htdocs/somedir">
Options +ExecCGI

AddHanlder  cgi-script .cgi
</Directory>

以上命令告诉apache 在这个目录下,以.cgi结尾的都是cgi文件

当然了,如果你没有编辑httpd.conf的权利,也是可以在.htaccess中设定的

另外你可以设定某个目录下都是cgi文件,可以使用下面的配置方式:

<Directory "/home/*/public_html/cgi-bin">
Options ExecCGI
SetHandler cgi-script
</Directory>