以下CloudFlare节点IP资料由HaoLan网友收集,仅供参考,这不是Anycast IP,是CloudFlare的节点IP,能不能指定节点还不清楚,可以在接入CF partner之后a记录以上IP试试。有网友说IP的80端口没开,大家可以当做CF测试IP。注意:每个C段不要用0结尾,用1
Month: September 2019
Debian 9 开启 BBR
Debian 9 和 10 的内核自带了google 开发的 BBR 拥塞算法,我们可以很方便的开启BBR 进行访问加速
开启方法:
echo "net.core.default_qdisc=fq" >> /etc/sysctl.conf
echo "net.ipv4.tcp_congestion_control=bbr" >> /etc/sysctl.conf
sysctl -p
如果执行之后没有报错,重启一下系统就可以让配置生效.
重启之后,执行如下命令查看内核是否已开启BBR:
sysctl net.ipv4.tcp_available_congestion_control
显示以下即已开启:
root@localhost:~# sysctl net.ipv4.tcp_available_congestion_control
net.ipv4.tcp_available_congestion_control = bbr cubic reno
查看BBR是否启动:
lsmod | grep bbr
显示以下即启动成功:
root@localhost:~# lsmod | grep bbr
tcp_bbr 16384 14
修改office365 outlook 的OST文件的位置
outlook中的邮件(除了pop3)都存储在OST文件中,如果你的C盘不够大的话,建议还是放在其他的SSD盘(pop3邮件一般存储在pst文件中)
outlook 的OST文件默认位置是C盘,如果想修改成其他的位置,google了一上午,发现最简单和便捷的办法就是修改注册表. 其他类似于修改profile 的方式太麻烦了
1 彻底关闭outlook 365 或者2016,同时保证OST 文件没有被其他的程序使用.
2 打开注册表,可以在run中输入regedit
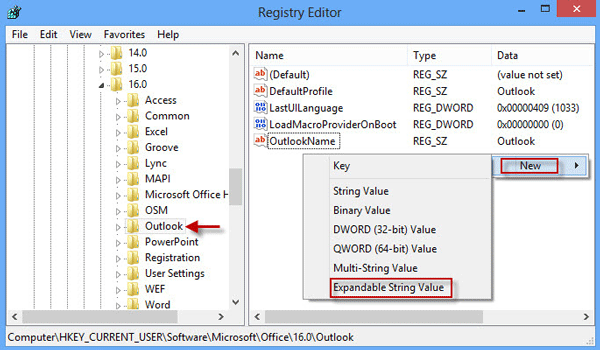
3 打开路径: HKEY_CURRENT_USER\Software\Microsoft\Office\16.0\Outlook, 在右边空白处右击,选择New -> Expandable String Value
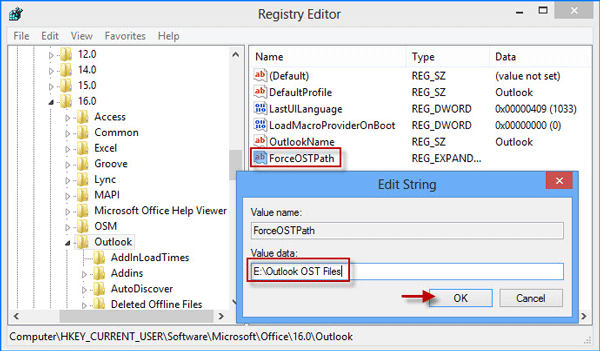
4 键名写”ForceOSTPath”, 然后双击这个键,在”Edit String” 中,填写你想要的 文件路径,然后点击“OK”
5 关闭注册表,然后重启电脑即可.
英文版参见: https://www.isumsoft.com/it/change-data-file-pst-ost-location-in-outlook-2016/
Sept 2019 Updated: 我发现添加ForceOSTPath的办法只能应用于exchange/hotmail/outlook/msn的邮箱,对于IMAP 的邮箱不起任何作用。搜索了半天发现了下面两篇文章:
https://social.technet.microsoft.com/Forums/en-US/f8cf7ce8-ca4c-4619-be32-f9f1a4ffa5fe/forceostpath-not-fully-working-bug-office-2016?forum=outlook
原来从Outlook 2013年开始, IMAP 和 EAS *.ost 使用的是ForcePSTPath, 而不是ForceOSTPath,尽管data file 是以.ost 结尾的!!!
这个需要注意!
Feb 2025 Update: 如果你的classic outlook要更改存储文件的位置,那么ForceOSTPath 和 ForcePSTPath 都是需要添加的
Windows LTSC 2019 各个版本
大家一般都喜欢在工作中部署LTSC 2019,简洁,稳定!
但是很多人在下载LTSC的时候,很容易被各种iso 弄混。其实说白了网上流传的这些iso都是微软发布的,只是不是版本而已,下面一一陈述:
2018年10月3号版本:
Product (Full Name): Windows 10 Enterprise LTSC 2019 (x64) - DVD (English)
File Type: DVD
Language: English (EN)
Architecture: x64
File: en_windows_10_enterprise_ltsc_2019_x64_dvd_74865958.iso
SHA1: 0b8476eff31f957590ade6fe671f16161037d3f6
File Size (MB): 3.61 GB
Date release: 2018-10-03
cn_windows_10_enterprise_ltsc_2019_x64_dvd_d17070a8.iso (4 GB)
ed2k://|file|cn_windows_10_enterprise_ltsc_2019_x64_dvd_d17070a8.iso|4290967552|9E80DED85693E8E4E0D76E55B1207221|/
SW_DVD5_WIN_ENT_LTSC_2019_64-bit_Chinese_Simplified_MLF_X21-96413.ISO (4 GB)
ed2k://|file|SW_DVD5_WIN_ENT_LTSC_2019_64-bit_Chinese_Simplified_MLF_X21-96413.ISO|4290967552|9E80DED85693E8E4E0D76E55B1207221|/
(English) Windows 10 Enterprise 2019 LTSC Version 1809 (Nov 2018) (x64) - DVD
File: SW_DVD5_WIN_ENT_LTSC_2019_64-bit_English_MLF_X21-96425.iso
File:en_windows_10_enterprise_ltsc_2019_x64_dvd_be3c8ffb.iso

en_windows_10_enterprise_ltsc_2019_x64_dvd_be3c8ffb.iso (3.78 GB)
ed2k://|file|en_windows_10_enterprise_ltsc_2019_x64_dvd_be3c8ffb.iso|4056717312|17B62BAE00F77F162247008710F55AF0|/
SW_DVD5_WIN_ENT_LTSC_2019_64-bit_English_MLF_X21-96425.ISO (3.78 GB)
ed2k://|file|SW_DVD5_WIN_ENT_LTSC_2019_64-bit_English_MLF_X21-96425.ISO|4056717312|17B62BAE00F77F162247008710F55AF0|/
中文x64:
cn_windows_10_enterprise_ltsc_2019_x64_dvd_9c09ff24.iso (4.17 GB)]cn_windows_10_enterprise_ltsc_2019_x64_dvd_9c09ff24.iso (4.17 GB)
ed2k://|file|cn_windows_10_enterprise_ltsc_2019_x64_dvd_9c09ff24.iso|4478906368|E7C526499308841A4A6D116C857DB669|/
英文x64:
en_windows_10_enterprise_ltsc_2019_x64_dvd_5795bb03.iso (4.03 GB)
ed2k://|file|en_windows_10_enterprise_ltsc_2019_x64_dvd_5795bb03.iso|4330432512|87DB27A367A86E56D62EA9ADA7F0D57B|/
WebNX Utah 服务器benchmark
/dev/sda:
=== START OF INFORMATION SECTION ===
Model Family: Intel 730 and DC S35x0/3610/3700 Series SSDs
Device Model: INTEL SSDSC2BA400G4
Serial Number: BTHV513606YB400NGN
LU WWN Device Id: 5 5cd2e4 04b7c7e4a
Firmware Version: G2010160
User Capacity: 400,088,457,216 bytes [400 GB]
Sector Sizes: 512 bytes logical, 4096 bytes physical
Rotation Rate: Solid State Device
Form Factor: 2.5 inches
Device is: In smartctl database [for details use: -P show]
ATA Version is: ACS-3 T13/2161-D revision 5
SATA Version is: SATA 3.1, 6.0 Gb/s (current: 6.0 Gb/s)
Local Time is: Wed Sep 18 22:16:03 2019 EDT
SMART support is: Available - device has SMART capability.
SMART support is: Enabled
可以看到SSD 是intel 的DC S3710
----------------------------------------------------------------------
CPU model            : Intel(R) Xeon(R) CPU E3-1271 v3 @ 3.60GHz
Number of cores      : 8
CPU frequency        : 1000.233 MHz
Total size of Disk   : 359.3 GB (1.1 GB Used)
Total amount of Mem  : 32129 MB (162 MB Used)
Total amount of Swap : 7627 MB (0 MB Used)
System uptime        : 0 days, 21 hour 29 min
Load average         : 0.01, 0.03, 0.00
OS                   : Debian GNU/Linux 10
Arch                 : x86_64 (64 Bit)
Kernel               : 4.19.0-6-amd64
----------------------------------------------------------------------
I/O speed(1st run)   : 418 MB/s
I/O speed(2nd run)   : 418 MB/s
I/O speed(3rd run)   : 417 MB/s
Average I/O speed    : 417.7 MB/s
----------------------------------------------------------------------
Node Name                       IPv4 address            Download Speed
CacheFly                        205.234.175.175         105MB/s
Linode, Tokyo2, JP              139.162.65.37           18.7MB/s
Linode, Singapore, SG           139.162.23.4            12.8MB/s
Linode, London, UK              176.58.107.39           18.9MB/s
Linode, Frankfurt, DE           139.162.130.8           17.0MB/s
Linode, Fremont, CA             50.116.14.9             71.7MB/s
Softlayer, Dallas, TX           173.192.68.18           30.1MB/s
Softlayer, Seattle, WA          67.228.112.250          33.6MB/s
Softlayer, Frankfurt, DE        159.122.69.4            8.31MB/s
Softlayer, Singapore, SG        119.81.28.170           7.09MB/s
Softlayer, HongKong, CN         119.81.130.170          7.78MB/s
第二遍测试:
----------------------------------------------------------------------
CPU model : Intel(R) Xeon(R) CPU E3-1271 v3 @ 3.60GHz
Number of cores : 8
CPU frequency : 1277.243 MHz
Total size of Disk : 359.3 GB (1.1 GB Used)
Total amount of Mem : 32129 MB (164 MB Used)
Total amount of Swap : 7627 MB (0 MB Used)
System uptime : 0 days, 21 hour 32 min
Load average : 0.07, 0.07, 0.01
OS : Debian GNU/Linux 10
Arch : x86_64 (64 Bit)
Kernel : 4.19.0-6-amd64
----------------------------------------------------------------------
I/O speed(1st run) : 419 MB/s
I/O speed(2nd run) : 418 MB/s
I/O speed(3rd run) : 418 MB/s
Average I/O speed : 418.3 MB/s
----------------------------------------------------------------------
Node Name IPv4 address Download Speed
CacheFly 205.234.175.175 105MB/s
Linode, Tokyo2, JP 139.162.65.37 17.0MB/s
Linode, Singapore, SG 139.162.23.4 13.0MB/s
Linode, London, UK 176.58.107.39 19.6MB/s
Linode, Frankfurt, DE 139.162.130.8 16.8MB/s
Linode, Fremont, CA 50.116.14.9 85.3MB/s
Softlayer, Dallas, TX 173.192.68.18 31.6MB/s
Softlayer, Seattle, WA 67.228.112.250 32.7MB/s
Softlayer, Frankfurt, DE 159.122.69.4 8.59MB/s
Softlayer, Singapore, SG 119.81.28.170 7.08MB/s
Softlayer, HongKong, CN 119.81.130.170 8.86MB/s
----------------------------------------------------------------------
/dev/sdb:
=== START OF INFORMATION SECTION ===
Model Family: Seagate Barracuda 3.5
Device Model: ST2000DM006-2DM164
Serial Number: Z560FAW9
LU WWN Device Id: 5 000c50 0a1e182e7
Firmware Version: CC26
User Capacity: 2,000,398,934,016 bytes [2.00 TB]
Sector Sizes: 512 bytes logical, 4096 bytes physical
Rotation Rate: 7200 rpm
Form Factor: 3.5 inches
Device is: In smartctl database [for details use: -P show]
ATA Version is: ACS-2, ACS-3 T13/2161-D revision 3b
SATA Version is: SATA 3.1, 6.0 Gb/s (current: 6.0 Gb/s)
Local Time is: Wed Sep 18 22:21:57 2019 EDT
SMART support is: Available - device has SMART capability.
SMART support is: Enabled
VM 中 private network 的配置
先借鉴一下流行的public cloud provider 的配置:
vultr private network 配置:
Vultr 建议private network 的MTU 设置为1450
# Private network: net5d808a0cc22db
DEVICE=eth1
ONBOOT=yes
BOOTPROTO=static
IPADDR=10.25.96.3
NETMASK=255.255.240.0
MTU=1450
VMware ESXi 和 vCSA 的MD5
ESXi 7.0U2a
VMware vSphere Hypervisor (ESXi ISO) image
2021-04-29 | 7.0U2a | 390.11 MB | iso

Boot your server with this image in order to install or upgrade to ESXi (ESXi requires 64-bit capable servers). This ESXi image includes VMware Tools.

MD5SUM(¹): 5491860344ce79fcf2ffec2e72b79245
SHA1SUM(¹): c1c03244b9aed6a5f40cc53752e4079969be9383
SHA256SUM(¹): 35d80d52dfca79f52eadd1c641e2f990371e834e98b3ef95914b7f950b42f629
vCSA 7.0U2a
VMware vCenter Server Appliance
2021-04-27 | 7.0U2a | 7.45 GB | iso

VMware vCenter Server Appliance ISO. It includes the UI and CLI installer for install\, upgrade and migration for VMware vCenter Server Appliance\, VMware vSphere Update Manager and Update Manager Download Service (UMDS).

MD5SUM(¹): 492ea215363dc9d67bb195437dc6edde
SHA1SUM(¹): 26c3e52a02b9144b026f8cf343d11d0dce125731
SHA256SUM(¹): f628e8ef6d785643a5ece512a852358f0d76432352960e2bb11319df2a5f8ea4
6.7 u3:
VMware vSphere Hypervisor (ESXi ISO) image (Includes VMware Tools)
2019-08-20 | 6.7.0U3 | 314.66 MB | iso

Boot your server with this image in order to install or upgrade to ESXi (ESXi requires 64-bit capable servers). This ESXi image includes VMware Tools.
VMware-VMvisor-Installer-6.7.0.update03-14320388.x86_64
MD5SUM(¹): cafb95ae04245eb3e93fed1602b0fd3b
SHA1SUM(¹): 415f08313062d1f8d46162dc81a009dbdbc59b3b
SHA256SUM(¹): fcbaa4cd952abd9e629fb131b8f46a949844405d8976372e7e5b55917623fbe0
VMware vCenter Server Appliance
2019-08-20 | 6.7.0U3 | 3.93 GB | iso

vCenter Server Appliance ISO. It includes the UI and CLI installer for install upgrade migration for VMware vCenter Server Appliance\, VMware Platform Services Controller\, VMware vSphere Update Manager and Update Manager Download Service (UMDS)

VMware-VCSA-all-6.7.0-14367737.iso
MD5SUM(¹): dff12f195347a61a45d3aee3278ebfca
SHA1SUM(¹): 6989f3e17278545d77251c46152c4e08e1c32db4
SHA256SUM(¹): d0bc2c26d6313a92323ac5f8cab8838324613e6762e3a749646bac6496d4d838
2019-10-24 | 6.7.0U3a | 3.92 GB | iso

vCenter Server Appliance ISO. It includes the UI and CLI installer for install\, upgrade\, migration for VMware vCenter Server Appliance\, VMware Platform Services Controller\, VMware vSphere Update Manager and Update Manager Download Service (UMDS).

VMware-VCSA-all-6.7.0-14836122.iso
MD5SUM(¹): bd986d69a66e24bbb6bd71c3c6ad4ac5
SHA1SUM(¹): b97711529af60e475e1de644010162be3c9d92e3
SHA256SUM(¹): ac817b8efbdfa6d1a40ea648f842621a7d14e37c8f5316f883ee4f1ccf61a6a5
Online.net Pro-4-M Benchmark
online的这台机器好像和esxi 有兼容性问题,不管了,先测试再说。
安装好ESXi,在使用vmware native driver 的情况下:
----------------------------------------------------------------------
CPU model : Intel(R) Xeon(R) CPU E3-1245 v5 @ 3.50GHz
Number of cores : 4
CPU frequency : 3504.000 MHz
Total size of Disk : 47.0 GB (1.2 GB Used)
Total amount of Mem : 3902 MB (165 MB Used)
Total amount of Swap : 3967 MB (0 MB Used)
System uptime : 0 days, 0 hour 3 min
Load average : 0.52, 0.20, 0.08
OS : CentOS 7.6.1810
Arch : x86_64 (64 Bit)
Kernel : 3.10.0-957.el7.x86_64
----------------------------------------------------------------------
I/O speed(1st run) : 499 MB/s
I/O speed(2nd run) : 498 MB/s
I/O speed(3rd run) : 497 MB/s
Average I/O speed : 498.0 MB/s
Server 2016 和 Windows 10中的USOclient.exe
USOclient.exe 是“Update Session Orchestrator”, 是windows update 的组件,主要用来检查windows update,在server 2016 和 windows 10 中用来代替windows update agent
关闭这个组件的步骤:
在运行里面输入gpedit.msc, 在local group policy editor中,依次选择”Computer Configuration” -> “Administrative Templates” -> “Windows Components” -> “Windows Update”, 双击”No auto restart with logged on users for scheduled automatic updates installations” 然后enable 就可以了
Supermicro IPMI 使用简述
Supermicro 的IPMI 要比Dell 的iDrac 和 HP 的iLO 要简单很多,速度也快了很多。
1)大部分的Supermicro 的机器, 在IDC那里已经设置为优先CD-ROM启动。因此只要你在virtual media 里面已经mount了安装系统的ISO文件,在你reset power 重启的时候,就会自动进入新系统的安装过程。但是如果系统没有从CD-ROM启动的话,那么可以在开机的时候按F11来选择从CD-ROM启动
2)要把ISO文件mount在CD-ROM上有两种方式, 一是在Supermicro 的web页面以后,点击菜单上的Virtual Media -> CD-ROM Image, 就可以使用Windows Share(CIFS) 或者 Linux SMB了。 填写完SMB 的信息以后,必须先点击Save再点击Mount, 如果成功的mount上了,点击一下Refresh Status, 就会弹出一个对话框显示 “The configuration of image on windows share has been successfully set”, 并且在Device 1 中显示”There is an iso file mounted”。 这种方法需要在你的network 内部有一个windows share 的网络存在,比较小众。 对于大部分人来说,应该会采用第二种方法,就是在supermicro 的web页面,在菜单上点击Remote Redirection -> Launch Console, 直接打开KVM console,在顶部的菜单中选择Virtual Media -> Virtual Storage, 选择本地的ISO file,然后Plug in

