Nginx 支持在if 语句中使用正则. 例如:
if ( condition ){
do_something
}
if ( $http_user_agent = "wget" ){
do_something
}
if ( $http_user_agent ~ MSIE ){
return 403;
}
C, C++, PHP, Python 开发 业余Front End 开发 Owner of Advertcn.com and cnMarketers.com
Nginx 支持在if 语句中使用正则. 例如:
if ( condition ){
do_something
}
if ( $http_user_agent = "wget" ){
do_something
}
if ( $http_user_agent ~ MSIE ){
return 403;
}
鉴于目前很多cloud 和 vps 的服务商还不提供debian 10 的模板,因此这里就先研究debian 9 的
root@vultr:~# nginx -V
nginx version: nginx/1.17.6
built by gcc 6.3.0 20170516 (Debian 6.3.0-18+deb9u1)
built with OpenSSL 1.1.0k 28 May 2019 (running with OpenSSL 1.1.0l 10 Sep 2019)
TLS SNI support enabled
configure arguments: --prefix=/etc/nginx --sbin-path=/usr/sbin/nginx --modules-path=/usr/lib/nginx/modules --conf-path=/etc/nginx/nginx.conf --error-log-path=/var/log/nginx/error.log --http-log-path=/var/log/nginx/access.log --pid-path=/var/run/nginx.pid --lock-path=/var/run/nginx.lock --http-client-body-temp-path=/var/cache/nginx/client_temp --http-proxy-temp-path=/var/cache/nginx/proxy_temp --http-fastcgi-temp-path=/var/cache/nginx/fastcgi_temp --http-uwsgi-temp-path=/var/cache/nginx/uwsgi_temp --http-scgi-temp-path=/var/cache/nginx/scgi_temp --user=nginx --group=nginx --with-compat --with-file-aio --with-threads --with-http_addition_module --with-http_auth_request_module --with-http_dav_module --with-http_flv_module --with-http_gunzip_module --with-http_gzip_static_module --with-http_mp4_module --with-http_random_index_module --with-http_realip_module --with-http_secure_link_module --with-http_slice_module --with-http_ssl_module --with-http_stub_status_module --with-http_sub_module --with-http_v2_module --with-mail --with-mail_ssl_module --with-stream --with-stream_realip_module --with-stream_ssl_module --with-stream_ssl_preread_module --with-cc-opt='-g -O2 -fdebug-prefix-map=/data/builder/debuild/nginx-1.17.6/debian/debuild-base/nginx-1.17.6=. -fstack-protector-strong -Wformat -Werror=format-security -Wp,-D_FORTIFY_SOURCE=2 -fPIC' --with-ld-opt='-Wl,-z,relro -Wl,-z,now -Wl,--as-needed -pie'
debian 9 自带openssl
root@vultr:~# openssl version
OpenSSL 1.1.0l 10 Sep 2019
debian 9 自带openssl的版本正是1.1.0l, 但是编译的是用1.1.0k
debian 9 用apt install gcc 以后,得到的版本是:
root@vultr:~# gcc -v
Using built-in specs.
COLLECT_GCC=gcc
COLLECT_LTO_WRAPPER=/usr/lib/gcc/x86_64-linux-gnu/6/lto-wrapper
Target: x86_64-linux-gnu
Configured with: ../src/configure -v --with-pkgversion='Debian 6.3.0-18+deb9u1' --with-bugurl=file:///usr/share/doc/gcc-6/README.Bugs --enable-languages=c,ada,c++,java,go,d,fortran,objc,obj-c++ --prefix=/usr --program-suffix=-6 --program-prefix=x86_64-linux-gnu- --enable-shared --enable-linker-build-id --libexecdir=/usr/lib --without-included-gettext --enable-threads=posix --libdir=/usr/lib --enable-nls --with-sysroot=/ --enable-clocale=gnu --enable-libstdcxx-debug --enable-libstdcxx-time=yes --with-default-libstdcxx-abi=new --enable-gnu-unique-object --disable-vtable-verify --enable-libmpx --enable-plugin --enable-default-pie --with-system-zlib --disable-browser-plugin --enable-java-awt=gtk --enable-gtk-cairo --with-java-home=/usr/lib/jvm/java-1.5.0-gcj-6-amd64/jre --enable-java-home --with-jvm-root-dir=/usr/lib/jvm/java-1.5.0-gcj-6-amd64 --with-jvm-jar-dir=/usr/lib/jvm-exports/java-1.5.0-gcj-6-amd64 --with-arch-directory=amd64 --with-ecj-jar=/usr/share/java/eclipse-ecj.jar --with-target-system-zlib --enable-objc-gc=auto --enable-multiarch --with-arch-32=i686 --with-abi=m64 --with-multilib-list=m32,m64,mx32 --enable-multilib --with-tune=generic --enable-checking=release --build=x86_64-linux-gnu --host=x86_64-linux-gnu --target=x86_64-linux-gnu
Thread model: posix
gcc version 6.3.0 20170516 (Debian 6.3.0-18+deb9u1)
正是我们用来编译nginx的版本,看来nginx 在debian 9下的编译,都是使用repo 自带的版本,没有使用任何特殊的版本
下面看下user group:
nginx:x:110:113:nginx user,,,:/nonexistent:/bin/false
看看user group history:
root@vultr:/var/log# grep nginx auth.log
Dec 11 09:08:55 vultr groupadd[1614]: group added to /etc/group: name=nginx, GID=113
Dec 11 09:08:55 vultr groupadd[1614]: group added to /etc/gshadow: name=nginx
Dec 11 09:08:55 vultr groupadd[1614]: new group: name=nginx, GID=113
Dec 11 09:08:55 vultr useradd[1620]: new user: name=nginx, UID=110, GID=113, home=/nonexistent, shell=/bin/false
Dec 11 09:08:55 vultr chage[1625]: changed password expiry for nginx
Dec 11 09:08:55 vultr chfn[1628]: changed user 'nginx' information
可以看到nginx user 和 group 被加入了system user 和group,因为从/etc/login.defs 我们可以看到:
# Min/max values for automatic uid selection in useradd
#
UID_MIN 1000
UID_MAX 60000
# System accounts
#SYS_UID_MIN 100
#SYS_UID_MAX 999

#
# Min/max values for automatic gid selection in groupadd
#
GID_MIN 1000
GID_MAX 60000
# System accounts
#SYS_GID_MIN 100
#SYS_GID_MAX 999
看看nginx service 的配置:
root@vultr:~# nano /lib/systemd/system/nginx.service

[Unit]
Description=nginx - high performance web server
Documentation=http://nginx.org/en/docs/
After=network-online.target remote-fs.target nss-lookup.target
Wants=network-online.target

[Service]
Type=forking
PIDFile=/var/run/nginx.pid
ExecStart=/usr/sbin/nginx -c /etc/nginx/nginx.conf
ExecReload=/bin/kill -s HUP $MAINPID
ExecStop=/bin/kill -s TERM $MAINPID

[Install]
WantedBy=multi-user.target
这个systemd 的配置和centos 的一模一样
将nginx服务器隐藏在cloudflare 服务后端,在nginx 的默认access log里面显示的IP 都是cloudflare,因此我们需要把日志中的访问IP改成真正的用户IP. 有很多种办法可以实现,但是下面的这种办法应该是最简单的.
Cloudflare 用X-Forwarded-For这个header 来传递用户的真实IP,因此我们只需要在nginx 的conf中,设置一个新的nginx log format就可以.
默认的nginx access log format 是:
log_format combined '$remote_addr - $remote_user [$time_local] '
                    '"$request" $status $body_bytes_sent '
                    '"$http_referer" "$http_user_agent"';
我们可以添加一个新的log format:
log_format csf '$http_x_forwarded_for - $remote_user [$time_local] '
                    '"$request" $status $body_bytes_sent '
                    '"$http_referer" "$http_user_agent"';
access log 可以设置成类似于这样的:
access_log /your/access/log/path csf;
这样,用户的真实IP就会展现在access log里面了
[root@vultr ~]# nginx -V
nginx version: nginx/1.16.1
built by gcc 4.8.5 20150623 (Red Hat 4.8.5-36) (GCC)
built with OpenSSL 1.0.2k-fips 26 Jan 2017
TLS SNI support enabled
configure arguments: --prefix=/etc/nginx --sbin-path=/usr/sbin/nginx --modules-path=/usr/lib64/nginx/modules --conf-path=/etc/nginx/nginx.conf --error-log-path=/var/log/nginx/error.log --http-log-path=/var/log/nginx/access.log --pid-path=/var/run/nginx.pid --lock-path=/var/run/nginx.lock --http-client-body-temp-path=/var/cache/nginx/client_temp --http-proxy-temp-path=/var/cache/nginx/proxy_temp --http-fastcgi-temp-path=/var/cache/nginx/fastcgi_temp --http-uwsgi-temp-path=/var/cache/nginx/uwsgi_temp --http-scgi-temp-path=/var/cache/nginx/scgi_temp --user=nginx --group=nginx --with-compat --with-file-aio --with-threads --with-http_addition_module --with-http_auth_request_module --with-http_dav_module --with-http_flv_module --with-http_gunzip_module --with-http_gzip_static_module --with-http_mp4_module --with-http_random_index_module --with-http_realip_module --with-http_secure_link_module --with-http_slice_module --with-http_ssl_module --with-http_stub_status_module --with-http_sub_module --with-http_v2_module --with-mail --with-mail_ssl_module --with-stream --with-stream_realip_module --with-stream_ssl_module --with-stream_ssl_preread_module --with-cc-opt='-O2 -g -pipe -Wall -Wp,-D_FORTIFY_SOURCE=2 -fexceptions -fstack-protector-strong --param=ssp-buffer-size=4 -grecord-gcc-switches -m64 -mtune=generic -fPIC' --with-ld-opt='-Wl,-z,relro -Wl,-z,now -pie'
我们可以看到nginx官方就是使用的Centos/RHEL官方自带的repo里的gcc来编译的, gcc 版本是4.8.5, openssl 也是官方repo里面自带的1.0.2k的版本(1.1.1以后的版本支持更多的加密方式)
因此nginx 的配置路径为:
nginx path prefix: "/etc/nginx"
nginx binary file: "/usr/sbin/nginx"
nginx modules path: "/usr/lib64/nginx/modules"
nginx configuration prefix: "/etc/nginx"
nginx configuration file: "/etc/nginx/nginx.conf"
nginx pid file: "/var/run/nginx.pid"
nginx error log file: "/var/log/nginx/error.log"
nginx http access log file: "/var/log/nginx/access.log"
nginx http client request body temporary files: "/var/cache/nginx/client_temp"
nginx http proxy temporary files: "/var/cache/nginx/proxy_temp"
nginx http fastcgi temporary files: "/var/cache/nginx/fastcgi_temp"
nginx http uwsgi temporary files: "/var/cache/nginx/uwsgi_temp"
nginx http scgi temporary files: "/var/cache/nginx/scgi_temp"
下面看看usergroup
vi /etc/password
nginx:x:997:995:nginx user:/var/cache/nginx:/sbin/nologin
看看user group history
[root@vultr ~]# grep nginx /var/log/secure
Dec 7 11:36:28 vultr groupadd[1162]: group added to /etc/group: name=nginx, GID=995
Dec 7 11:36:28 vultr groupadd[1162]: group added to /etc/gshadow: name=nginx
Dec 7 11:36:28 vultr groupadd[1162]: new group: name=nginx, GID=995
Dec 7 11:36:28 vultr useradd[1167]: new user: name=nginx, UID=997, GID=995, home=/var/cache/nginx, shell=/sbin/nologin
看看nginx service
vi /usr/lib/systemd/system/nginx.service
[Unit]
Description=nginx - high performance web server
Documentation=http://nginx.org/en/docs/
After=network-online.target remote-fs.target nss-lookup.target
Wants=network-online.target

[Service]
Type=forking
PIDFile=/var/run/nginx.pid
ExecStart=/usr/sbin/nginx -c /etc/nginx/nginx.conf
ExecReload=/bin/kill -s HUP $MAINPID
ExecStop=/bin/kill -s TERM $MAINPID

[Install]
WantedBy=multi-user.target
shell> mysqldump db1 > dump.sql
shell> mysqladmin create db2
shell> mysql db2 < dump.sql
Do not use –databases on the mysqldump command line because that causes USE db1 to be included in the dump file, which overrides the effect of naming db2 on the mysql command line.
有的时候root的密码不为空,这个时候我们就需要:
shell> mysqldump -uroot -p db1 > dump.sql
这个我们就可以把db1的表给倒出来了
Monit 是一个开源的linux 程序,用来监控程序,并且在必要的时候重启.
在centos上安装的非常的简单.
首先需要安装epel repo:
yum install epel-release
然后就可以安装monit了
yum install monit
将monit加入开机自启动并且start monit进程:
systemctl enable monit
systemctl start monit
查看monit 状态:
systemctl status monit
最近运行了一些IIS 服务器来做下载服务器,在下载.iso 文件的时候,经常会有404 error,这是因为IIS 服务器的配置文件里面没有正确的iso文件的MIME类型,因此我们需要为iso 文件添加MIME 类型
在IIS Manager上,Sites -> Your_Site, 在右边feature view里面双击MIME Types, 选择添加, file name extension 为 iso, MIME type 是
application/octetstream
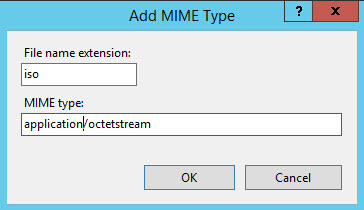
点击OK,这时候你在下载就会发现404 错误没有了
用netinst.iso 安装的debian 和 ubuntu,默认都会开启IPv6,但是很多服务商并不分配IPv6,因此大部分的时候我们需要将IPv6 关闭。主要有两种办法,一个是修改sysctl.conf, 或者是在/etc/sysctl.d 目录下创建一个.conf 文件
Method 1:
编辑/etc/sysctl.conf 文件,在文件的最末尾添加下面的entry:
net.ipv6.conf.all.disable_ipv6 = 1
如果仅想关闭某一网卡的ipv6,比如说ens4, 那就可以添加下面的entry:
net.ipv6.conf.ens4.disable_ipv6 = 1
让命令生效:
sysctl -p
Method 2:
在/etc/sysctl.d 目录下创建70-disable-ipv6.conf
nano /etc/sysctl.d/70-disable-ipv6.conf
添加下面的entry:
net.ipv6.conf.all.disable_ipv6 = 1
如果仅仅想关闭某一网卡,比如说ens4, 添加下面的entry:
net.ipv6.conf.ens4.disable_ipv6 = 1
立刻生效:
sysctl -p -f /etc/sysctl.d/70-disable-ipv6.conf
就是这么简单
open-vm-tools 是esxi 采用的开源版本的vmware tools
在ESXi的虚拟机上,你或者安装vmware tools,或者安装开源版本的open-vm-tools. 在vmware的官方文档上,open-vm-tools 是被推荐使用的.
在centos7, debian 9 或者debian 10上,安装open-vm-tools 非常的简单,只需要一条命令就可以:
yum install open-vm-tools
apt-get install open-vm-tools
安装完毕以后,需要重启一下让open-vm-tools生效
需要在防火墙里面设置,首先打开windows firewall页面,然后单击右边的Advanced settings, 在inbound rules里面找到
File and Printer Sharing (Echo Request - ICMPv4-In)
File and Printer Sharing (Echo Request - ICMPv6-In)
在右边选择enable就可以了