这个无疑是国内广大果粉最喜欢看到的
来自9to5google的消息, google fi 的wifi calling 开始支持苹果手机
这个无疑是国内广大果粉最喜欢看到的
来自9to5google的消息, google fi 的wifi calling 开始支持苹果手机
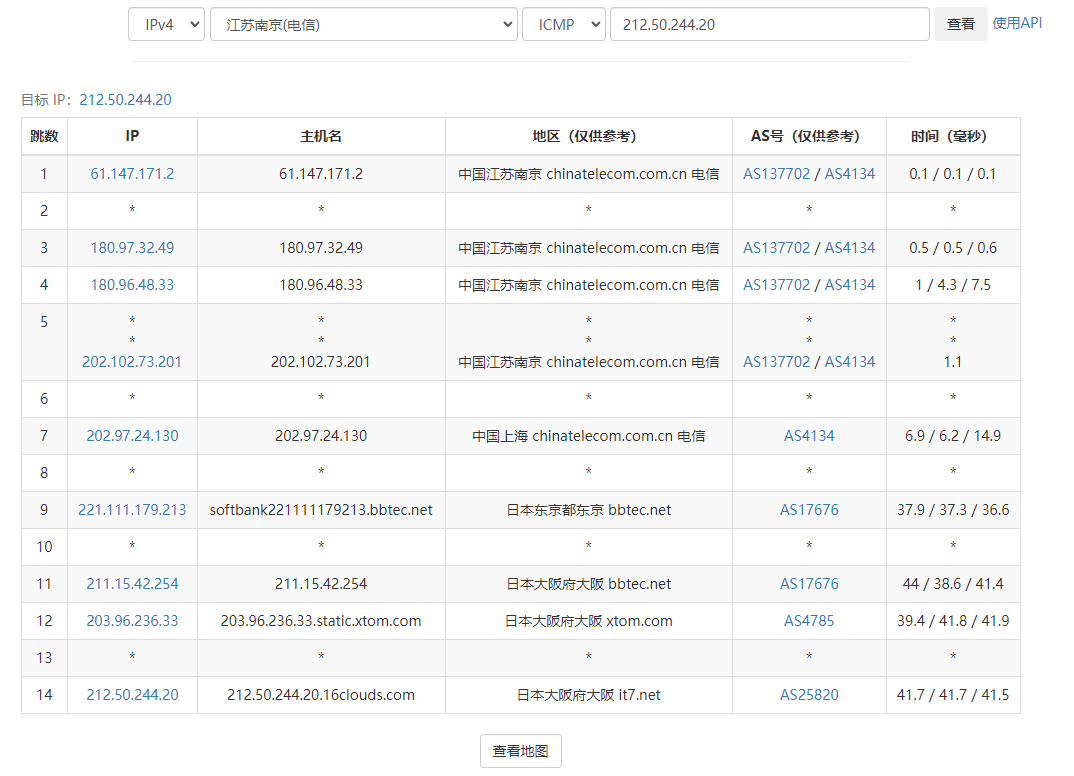
瓦工日本大阪软银机房其实就是xTom(v.ps)的日本机房
可以看到,是上海电信163直连日本软银,网络还是很不错的
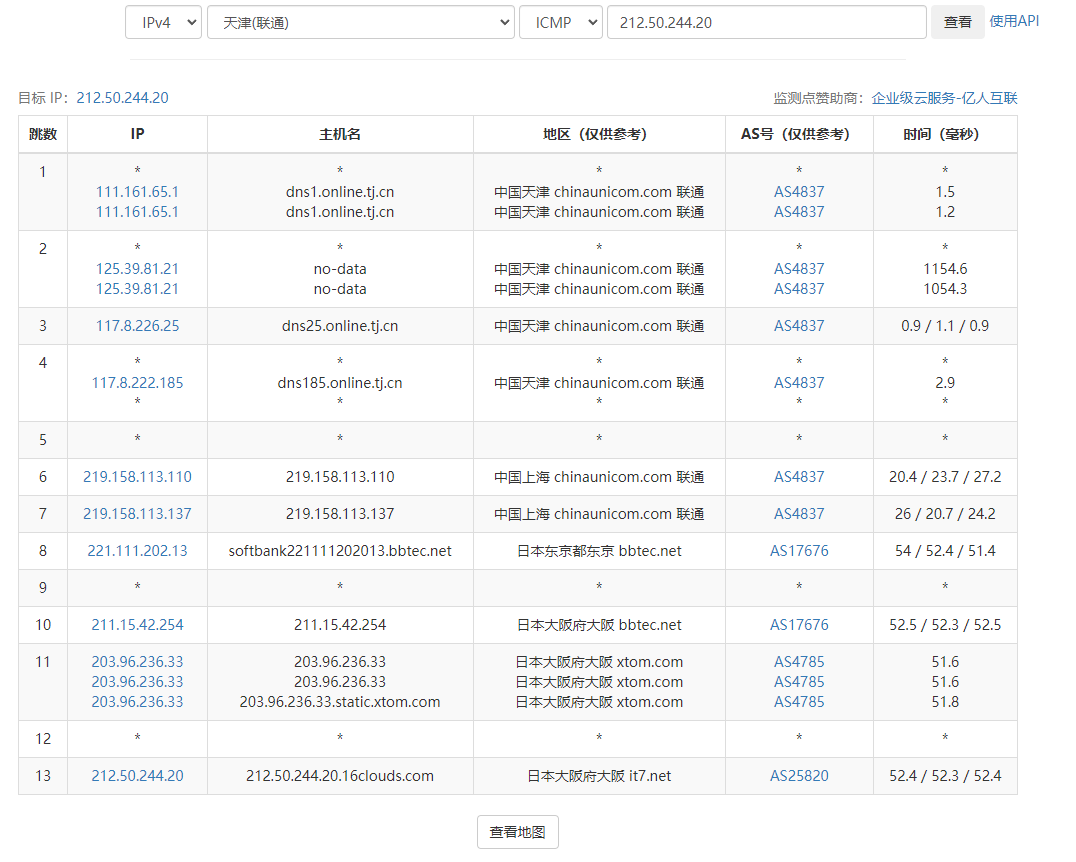
瓦工日本大阪软银机房其实就是xTom(v.ps)的日本机房
可以看到,是上海联通直连日本软银,网络还是很不错的
走到广东交换成联通,经上海联通到东京联通->阿里云JP,原来的BBTEC都没有了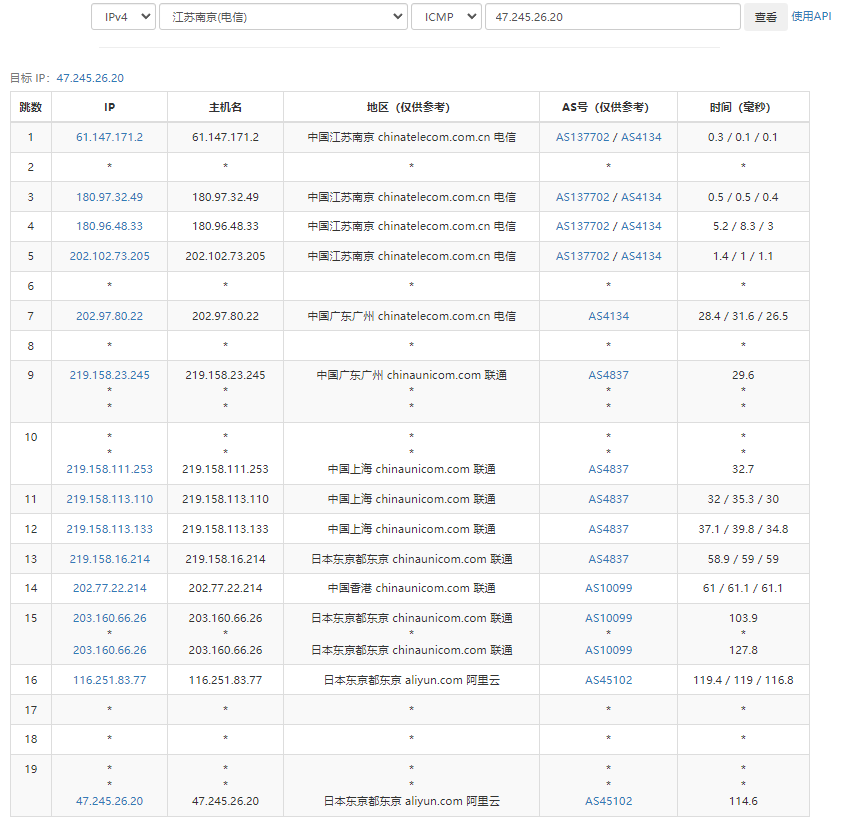
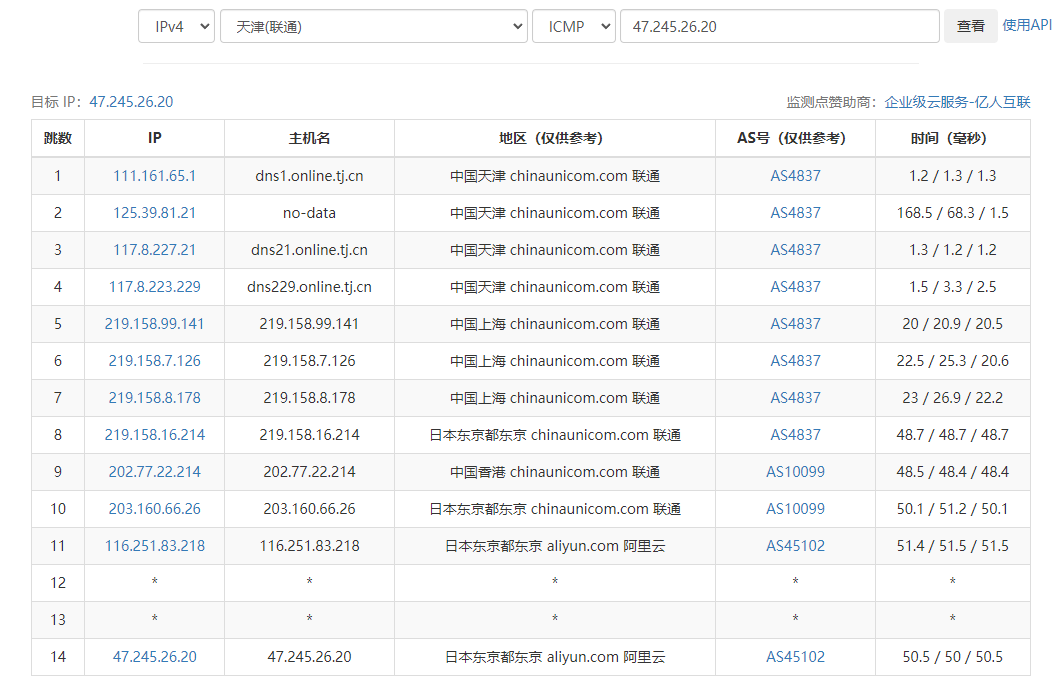
走上海联通和日本联通,到阿里云日本机房, 并没有走以前的bbtec线路
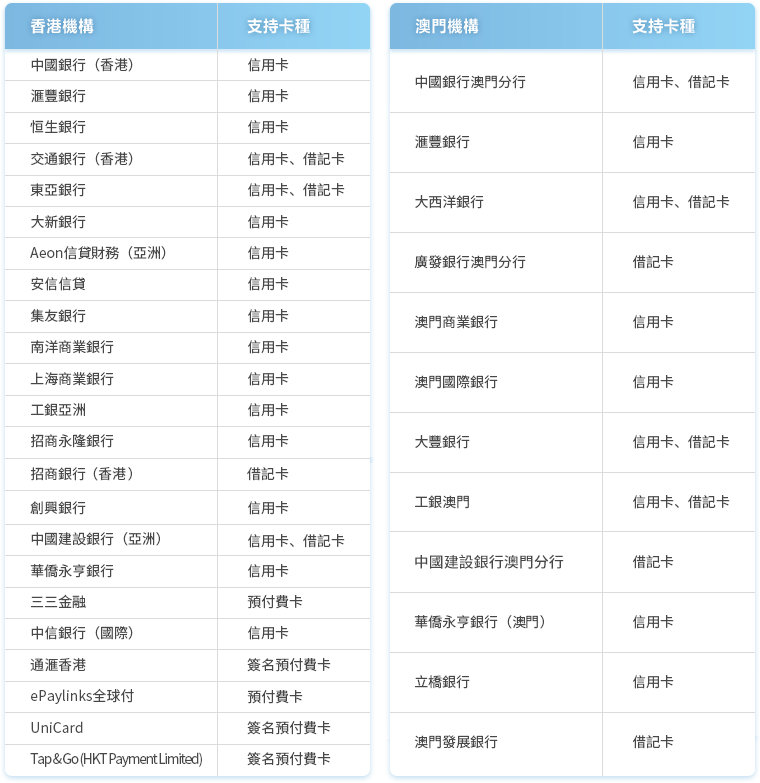
港澳支持借记卡的只有交通银行香港,东亚银行,建行亚洲,招商香港,中国银行澳门分行,大西洋银行,工银澳门,大豐銀行,广发银行澳门分行,建行澳门,澳门发展银行
香港:
Airwallex (Hong Kong) Limited(Visa 信用卡)
Airwallex(香港)Limited(Visa 信用卡)
American Express*
美国银行香港分行(Mastercard 信用卡)
中国银行(香港)(Mastercard、银联和 Visa 信用卡、银联借记卡)
东亚银行(Mastercard、银联和 Visa 信用卡)
中信银行(国际)(MasterCard 和 Visa 信用卡)
中国建设银行(亚洲)(Mastercard、银联和 Visa 信用卡)
花旗银行(Mastercard 和 Visa 信用卡、MasterCard 借记卡)
大新银行(Mastercard 和 Visa 信用卡)
星展银行(MasterCard 和 Visa 信用卡)
恒生银行(Mastercard、银联和 Visa 信用卡)
HKT Payment Limited(Mastercard 和银联储值卡)
汇丰银行(Visa 信用卡、Mastercard 和银联借记卡及信用卡)
中国工商银行(亚洲)(银联和 Visa 信用卡)
Livi Bank(Mastercard 借记卡)
Mox Bank Limited(Mastercard 借记卡)
安信信贷有限公司(CUP 和 Visa 信用卡)
渣打银行(Mastercard 和 Visa 信用卡、银联借记卡)
TNG (Asia) Limited(Mastercard 储值卡)
WeLab Bank Limited(Mastercard 借记卡)
众安银行(Visa 借记卡)
澳门:
大西洋银行(Mastercard 和银联借记卡、Visa 和银联信用卡)
中国银行澳门分行(银联信用卡和借记卡)
中国工商银行(澳门)(银联信用卡)
新加坡:
American Express*
花旗银行(Mastercard 和 Visa 信用卡、Mastercard 借记卡)
星展银行(MasterCard 和 Visa 信用卡和借记卡)
汇丰银行(Mastercard 和 Visa 信用卡、Visa 借记卡)
华侨永亨银行(Mastercard 和 Visa 信用卡及借记卡)
新加坡邮政储蓄银行(Mastercard 信用卡和借记卡)
Singtel(Visa 储值卡)
渣打银行(MasterCard 信用卡和借记卡、Visa 信用卡)
大华银行(MasterCard 和 Visa 信用卡和借记卡)
Wise
这是在飞客上看到的玩法,很有意思,可以很有效的消耗一部分港币.
具体操作就是把香港的银联提款卡添加到苹果手机上的Apple Pay里面,然后通过内地云闪付调用Apple Pay进行信用卡还款.
飞客上提及了几点注意事项:
香港银行发行的银联卡在内地的各种交易,包括ATM取现,线下扫码,各种pay,刷卡等等,都适用于银联国际当天的港币对人民币的汇率
那么这个汇率是怎么确定的呢?从银联国际的网站上,我们可以看到:
银联系统中的汇率,是依据多个渠道和市场化原则取得的基础汇率,不包括发卡行额外收取的任何费用以及四舍五入等因素的影响(如有)。
银联卡交易通常适用交易日当天的汇率,但在特殊情况下,适用交易结算日的汇率。(注:交易日系指交易实际发起的日期,结算日系指银联与发卡行、收单行进行资金清算的日期)
银联系统汇率周一至周五每日更新,周六周日延用周五汇率。如无特殊情况,部分欧系货币汇率生效时间为北京时间16:30,其他货币汇率生效时间为北京时间11:00。特别提示,本网页查询显示的汇率更新时间可能晚于前述生效时间。
持卡人如需更详细地了解交易汇率,请咨询发卡行。
银联国际汇率查询:
https://www.unionpayintl.com/cn/rate/
也就是说,港币汇率是每天上午的11点确定,一直到第二天上午的11点. 周五11点的汇率会一直延申到周一上午的11点.
早上发现一个站点很奇怪,PV/UV接近1:1
看了一下log, 才发现原来是Petal Bot 在做怪,google 了一下发现petalsearch.com这个搜索引擎貌似是huawei的产品.
关于这个产品,在huawei的网站上有详细的说明
PetalBot is an automatic program of the Petal search engine. The function of PetalBot is to access both PC and mobile websites and establish an index database which enables users to search the content of your site in Petal search engine. You can identify crawling from Petal by analyzing the User-agent field.
在PC上的UA: Mozilla/5.0 (compatible;PetalBot;+http://aspiegel.com/petalbot)
在mobile上的UA:
Mozilla/5.0(Linux;Android7.0;)
AppleWebKit/537.36(KHTML,likeGecko)
MobileSafari/537.36(compatible;PetalBot;+http://aspiegel.com/petalbot)
常用的ASN是 AS136907 Huawei Cloud Singapore, 可以安心的把这个ASN封掉